Choco-Banana Bliss Ice Pops Recipe
When it comes to refreshing summer treats, few things can compete with the delightful combination of chocolate and banana. The Choco-Banana Bliss Ice Pops are an irresistible dessert that encapsulates this beloved flavor pairing, making it a perfect choice for a warm day. Not only are these ice pops delicious, but they also offer a nutritious twist that sets them apart from traditional frozen desserts.
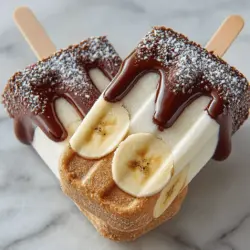
Imagine the creamy texture of ripe bananas blended with the richness of peanut butter, all coated in a luscious layer of dark chocolate. This recipe appeals to both kids and adults, making it an ideal family-friendly treat that you can whip up in no time. Plus, with the option to customize ingredients, the Choco-Banana Bliss Ice Pops cater to various dietary preferences, including vegan and gluten-free diets.
The Health Benefits of Bananas and Peanut Butter
Before diving into the recipe, it’s essential to highlight the health benefits of two key ingredients: bananas and peanut butter. Bananas are not only delicious but also packed with essential nutrients. They are an excellent source of potassium, which is vital for heart health and maintaining healthy blood pressure levels. Additionally, bananas provide dietary fiber, which aids in digestion and helps keep you feeling full longer.
Peanut butter, on the other hand, is a fantastic source of protein and healthy fats. It contains monounsaturated fats that can help reduce bad cholesterol levels. Moreover, the protein content makes peanut butter a satisfying addition, perfect for curbing cravings. When you combine these two ingredients, you create a wholesome snack that not only satisfies your sweet tooth but also offers a range of nutritional benefits.
Versatility for Different Dietary Preferences
One of the standout features of the Choco-Banana Bliss Ice Pops is their versatility. This recipe can be easily adapted to meet various dietary needs. For those following a vegan diet, simply choose a plant-based yogurt alternative and swap honey for maple syrup. This way, everyone can enjoy these delightful ice pops without compromising their dietary choices. Furthermore, the recipe is naturally gluten-free, making it a safe option for those with gluten sensitivities.
Whether you’re looking for a quick snack to cool down on a hot day, a healthy dessert for family gatherings, or a nutritious treat to satisfy your sweet cravings, these ice pops fit the bill perfectly.
Understanding the Ingredients
To create the perfect Choco-Banana Bliss Ice Pops, it’s crucial to understand the key ingredients and their nutritional benefits. Each component plays a vital role in the overall flavor, texture, and health profile of the final product.
Ripe Bananas: Nutritional Profile and Health Benefits
The star of this recipe is undoubtedly the ripe banana. When selecting bananas for this ice pop recipe, opt for ones that are perfectly ripe, with a few brown spots. These markings indicate that the bananas are sweet and ready to be blended into a creamy mixture. Nutritionally, bananas are a powerhouse of vitamins, particularly vitamin C and vitamin B6. They also contain important minerals like potassium and magnesium, which contribute to overall health.
Creamy Peanut Butter: Protein Source and Healthy Fats
Next up is creamy peanut butter. This ingredient not only adds a rich flavor but also enhances the nutritional value of the ice pops. A two-tablespoon serving of peanut butter contains about 8 grams of protein, making it an excellent source of energy, especially for active individuals. Additionally, peanut butter is rich in antioxidants and contains heart-healthy fats that can promote good cardiovascular health. When selecting peanut butter, aim for natural varieties without added sugars or hydrogenated oils for the healthiest option.
Greek Yogurt: Probiotics and Creaminess Factor
To elevate the creaminess of the ice pops, Greek yogurt is included in the recipe. This ingredient not only contributes to a smooth texture but also provides a dose of probiotics, which are beneficial for gut health. Greek yogurt is also lower in sugar and higher in protein compared to regular yogurt, making it a smart choice for those looking to maintain a balanced diet.
Honey vs. Maple Syrup: Natural Sweetener Comparison
For sweetness, you can choose between honey or maple syrup. Honey is a natural sweetener that offers antioxidant properties and is known for its soothing effects on the throat. However, it’s not suitable for vegans. Maple syrup, on the other hand, is a vegan-friendly sweetener that contains minerals like manganese and zinc. Both options can enhance the flavor of the ice pops, and the choice ultimately comes down to personal preference.
Vanilla Extract: Flavor Enhancer
A splash of vanilla extract is added to the mixture for an extra layer of flavor. This ingredient not only enhances the overall taste but also provides aromatic qualities that make the ice pops even more enticing. Look for pure vanilla extract to ensure the best flavor and avoid synthetic varieties.
Sea Salt: Balancing Sweetness
A pinch of sea salt is often overlooked in dessert recipes, but it plays a crucial role in balancing sweetness. By adding just a small amount of salt, you elevate the flavors and enhance the overall experience of the ice pops.
Dark Chocolate Chips (Optional): Antioxidant Benefits
For those who wish to indulge a bit further, incorporating dark chocolate chips can take these ice pops to the next level. Dark chocolate is loaded with antioxidants and has been associated with various health benefits, including improved heart health. If you opt for this addition, choose high-quality dark chocolate with a cocoa content of at least 70% for maximum benefits.
Coconut Oil (Optional): Health Benefits and Texture Enhancer
Lastly, coconut oil can be added to the melted chocolate to create a smoother texture and enhance the chocolate coating’s shine. Coconut oil is known for its medium-chain triglycerides (MCTs), which may support metabolism and provide a quick source of energy. This optional ingredient can help achieve a beautifully creamy consistency for your chocolate coating.
Step-by-Step Instructions for Making Choco-Banana Bliss Ice Pops
Now that we’ve covered the ingredients and their benefits, it’s time to dive into the step-by-step instructions for making these delightful Choco-Banana Bliss Ice Pops.
Preparing the Banana Mixture
1. Select and Prepare Your Bananas: Start by choosing 3 to 4 ripe bananas. Peel them and cut them into smaller pieces for easier blending.
2. Blend the Ingredients: Place the banana pieces in a blender or food processor. Add 1 cup of Greek yogurt, 1/2 cup of creamy peanut butter, 2 tablespoons of honey or maple syrup (adjust to taste), 1 teaspoon of vanilla extract, and a pinch of sea salt. Blend until the mixture is completely smooth and creamy. This step is crucial as it ensures that your ice pops have a velvety texture.
3. Achieving the Perfect Consistency: If the mixture is too thick, you can add a splash of almond milk or your preferred milk alternative to thin it out slightly. Blend again until you reach a creamy, pourable consistency.
Melting Chocolate (Optional)
If you decide to coat your ice pops in chocolate, melting it is the next step.
1. Choose Your Melting Method: You can melt the dark chocolate chips using either a microwave or a double boiler. If using a microwave, place the chocolate chips in a microwave-safe bowl and heat in 30-second intervals, stirring in between until fully melted. If using a double boiler, fill the bottom pot with water and bring it to a simmer. Place the chocolate chips in the top pot, stirring until melted.
2. Incorporating Coconut Oil: If you want a smoother chocolate coating, add 1 teaspoon of coconut oil to the melted chocolate and stir until well combined. This addition will help create a glossy finish when the chocolate sets.
As you prepare to assemble your Choco-Banana Bliss Ice Pops, keep your popsicle molds ready for the next steps in this delicious and nutritious treat adventure.

Creating homemade ice pops is not only a delightful way to cool off on a hot day but also a fantastic opportunity to indulge in healthy, delicious ingredients. The Choco-Banana Bliss Ice Pops combine the rich flavors of chocolate and banana, providing a sweet treat that is both satisfying and nutritious. Below, we detail the steps for preparing these pops, along with serving suggestions, variations, and nutritional insights.
Preparing the Ice Pop Molds
Before you begin the fun part of layering your mixtures, it’s essential to prepare your ice pop molds. Choose molds that are BPA-free to ensure safety during the freezing process. If you are using traditional ice pop molds, ensure they are clean and dry. For easier release, consider lightly coating the insides with a non-stick spray or using silicone molds, which are naturally non-stick.
Creative Ideas for Layering Chocolate and Banana Mixture
The beauty of Choco-Banana Bliss Ice Pops lies in the ability to create beautiful layers. You can start by pouring a layer of the chocolate mixture at the bottom of the mold, followed by a banana layer, and then alternating the two. This not only creates a visually appealing treat but also allows for a delightful combination of flavors in every bite.
For an added flair, consider swirling the mixtures together using a skewer. This can create a marbled effect, enhancing both the visual appeal and the flavor complexity.
Suggestions for Adding Extra Ingredients
To take your ice pops to the next level, consider incorporating chunks of fresh bananas or mini chocolate chips into the layers. These add texture and bursts of flavor as you enjoy each pop. You can also experiment with chocolate swirls by drizzling melted chocolate into the molds before filling them with the banana mixture, creating a delightful surprise with every bite.
Filling the Molds and Inserting Sticks
Once you have your layers and extra ingredients ready, it’s time to fill the molds. Carefully pour your banana and chocolate mixtures, allowing them to settle slightly before adding more layers. When inserting the sticks, ensure they are positioned straight and centered in each mold. This will help the pops freeze evenly and make for an easier removal once frozen.
Advice on Leaving Space for Expansion During Freezing
It’s crucial to leave a little space at the top of each mold. As the mixture freezes, it will expand, and leaving room will prevent overflow, ensuring a clean edge on your pops. A good rule of thumb is to fill the molds about three-quarters full.
Ensuring Sticks are Centered for Even Freezing
Aligning the sticks is important for achieving uniform ice pops. If the sticks are off-center, it could lead to uneven freezing, making it difficult to remove the pops later. To keep them in place, you can cover the molds with foil and poke the sticks through, which will help maintain their position.
Freezing Time and Tips for Best Results
Once your molds are filled and the sticks are in place, it’s time to freeze. Place the molds in your freezer and aim for a freezing duration of at least 4-6 hours. However, for the best texture and ease of removal, we recommend freezing overnight.
For optimal results, avoid opening the freezer frequently during the freezing process, as this can affect the temperature and lead to less-than-ideal pops.
Recommended Freezing Duration for Optimal Texture
To achieve the perfect balance of creaminess and firmness, aim for a minimum of 6 hours of freezing time. If you’re in a hurry, you can taste-test after 4 hours, but for the best flavor and texture, allow them to freeze overnight.
Serving Suggestions and Variations
Once your Choco-Banana Bliss Ice Pops are fully frozen, it’s time to enjoy them! Here are some creative serving suggestions and variations to elevate your homemade treats.
Ideas for Serving Choco-Banana Bliss Ice Pops
These delightful pops can be served straight from the mold or removed for serving. If you’re hosting a gathering, consider presenting them on a platter surrounded by fresh fruit like strawberries or raspberries for a pop of color and flavor. You could also drizzle some melted chocolate or a sprinkle of crushed nuts over the top for added flair.
Pairing with Fruits or Toppings
For a delightful twist, serve your pops with a side of fresh fruit or a dollop of yogurt. Sliced strawberries, blueberries, or even a fresh banana complement the flavors beautifully. Additionally, toppings such as shredded coconut, chopped nuts, or granola can add texture and make for an appealing presentation.
Presentation Tips for Parties or Gatherings
For special occasions, arrange your Choco-Banana Bliss Ice Pops in a tall glass or a decorative bucket filled with ice. This not only keeps them cold but also adds a cheerful and festive touch to your event. You can also label each flavor if you decide to make variations, allowing guests to choose their favorite.
Variations of the Recipe for Different Dietary Needs
This recipe is wonderfully adaptable. For those with dietary restrictions, you can easily modify the ingredients.
Vegan Options and Substitutions
To make these pops vegan-friendly, use plant-based milk such as almond, soy, or oat milk. Substitute traditional chocolate with vegan chocolate chips or cocoa powder. You can also use maple syrup or agave nectar as a sweetener instead of honey.
Alternative Nut Butters for Flavor Changes
If you want to switch up the flavors, consider using different nut butters such as almond butter or cashew butter. Each brings its unique taste and creaminess, enhancing the overall flavor profile of your ice pops.
Suggestions for Different Chocolate Types
Experimenting with different types of chocolate can also yield delicious results. Try using dark chocolate for a richer flavor, white chocolate for a sweeter pop, or even sugar-free chocolate for a healthier option.
Nutritional Information
Understanding the nutritional breakdown of your Choco-Banana Bliss Ice Pops can help you enjoy them guilt-free.
Overview of the Nutritional Breakdown Per Serving
Each pop typically contains:
– Calories: 120
– Total Fat: 5g
– Carbohydrates: 20g
– Fiber: 2g
– Protein: 3g
These values can vary based on the specific ingredients used, especially if you opt for different nut butters or chocolate types.
Health Benefits Associated with Each Ingredient
– Bananas: Rich in potassium and vitamins, bananas are excellent for heart health and energy.
– Nut Butter: Provides healthy fats and protein, contributing to satiety and muscle repair.
– Dark Chocolate: Contains antioxidants that may improve heart health and lower blood pressure.
Discussing Portion Sizes and Balancing with an Overall Diet
Even though these pops are healthier than many store-bought options, moderation is key. Enjoy these treats as part of a balanced diet, and consider portion sizes to maintain your dietary goals.
Conclusion
Making Choco-Banana Bliss Ice Pops at home is a rewarding and enjoyable experience. Not only can you customize the flavors to suit your preferences, but you also benefit from knowing exactly what goes into your treats. This recipe is simple, healthy, and perfect for any occasion.
We encourage you to explore your creativity with this recipe—try different layers, mix in your favorite ingredients, and enjoy the process of crafting your frozen delights. Your homemade Choco-Banana Bliss Ice Pops are sure to be a hit with family and friends, offering a delicious way to cool down while staying healthy. Embrace the joy of making these treats and share your creations with others!