
Introduction to No-Bake Banana Cream Pie Cups
Delightful and indulgent, No-Bake Banana Cream Pie Cups are a charming twist on a classic dessert that brings together creamy vanilla pudding, fresh bananas, and a crunchy graham cracker crust. This easy-to-make treat not only satisfies your sweet tooth but also showcases the delightful flavors of bananas in a fun and portable cup format. Whether you’re hosting a gathering, enjoying a picnic, or simply treating your family to something special, these cups provide a hassle-free way to indulge in a comforting dessert without the need to turn on the oven.
The allure of No-Bake Banana Cream Pie Cups lies in their simplicity and versatility. They can be prepared in advance, allowing flavors to meld beautifully while freeing up your time on the day of the event. Additionally, their individual serving sizes make them perfect for sharing, ensuring that everyone gets just the right amount of this luscious dessert. In this article, we will delve into the ingredients that make up this scrumptious treat, provide a detailed preparation guide, and explore why this recipe is a must-try for both novice and experienced cooks alike.
Understanding the Ingredients
To create the perfect No-Bake Banana Cream Pie Cups, it’s crucial to understand the role each ingredient plays in the overall flavor and texture of the dessert.
– Graham Cracker Crumbs: The foundation of the pie crust, graham cracker crumbs provide a sweet and crumbly texture that complements the creamy filling perfectly. Their slight cinnamon flavor adds warmth, enhancing the overall taste of the dessert.
– Unsalted Butter: This ingredient is essential for binding the crust together while adding richness. Unsalted butter is preferred to allow for better control over the sweetness and saltiness of the dessert.
– Sugar: A touch of sugar enhances the sweetness of the crust and balances the flavors in the filling, ensuring a delightful experience in every bite.
– Ripe Bananas: The star of the show, ripe bananas offer natural sweetness and flavor, which are crucial for the pie’s essence. Choosing bananas that are just ripe ensures they are soft enough to blend seamlessly into the pudding filling.
– Instant Vanilla Pudding Mix: This convenient ingredient allows you to create a creamy filling without the need for cooking. It simplifies the preparation process, making this recipe accessible to cooks of all skill levels.
– Cold Milk: Cold milk activates the pudding mix, creating a smooth texture that is both creamy and stable. The temperature is crucial; using cold milk ensures the pudding sets properly.
– Vanilla Extract: A splash of vanilla extract elevates the flavor profile with aromatic notes, enriching the overall taste of the dessert.
– Whipped Topping: This light, airy ingredient adds a fluffy texture to the filling, making it feel indulgent without being overly heavy. Whipped topping helps balance the richness of the pudding.
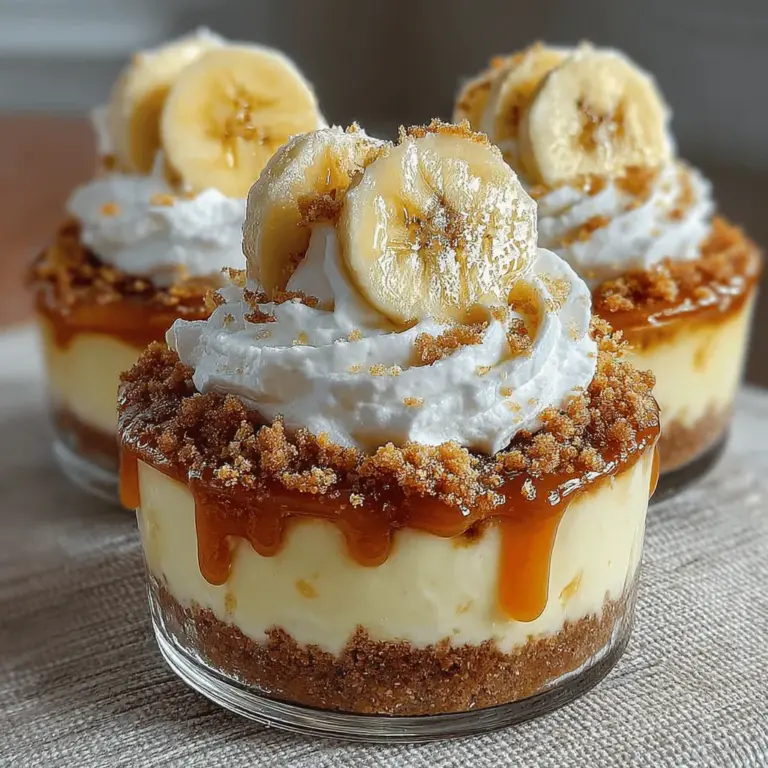
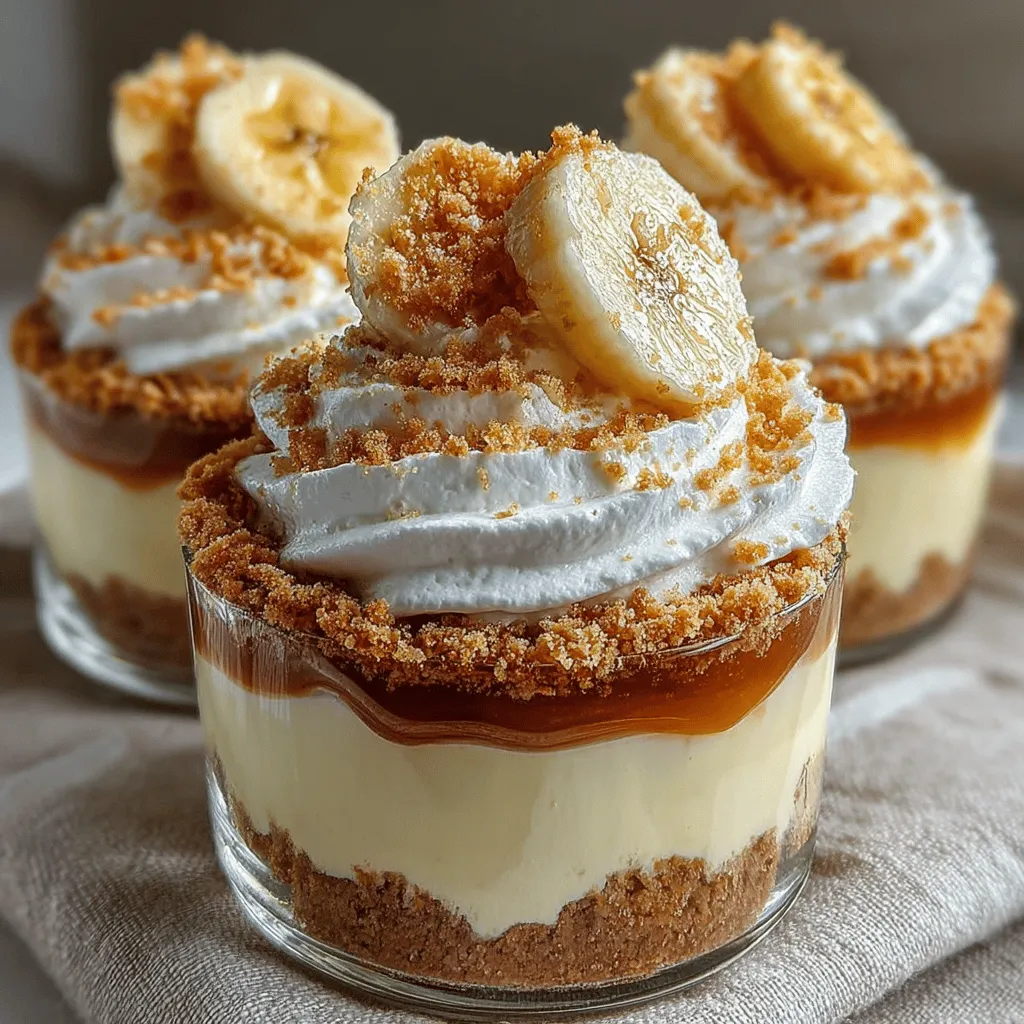
– Optional Garnishes: Additional banana slices and crushed graham crackers can be used for presentation, adding visual appeal and an extra layer of texture to your dessert cups.
Step-by-Step Guide to Crafting Banana Cream Pie Cups
Preparing the Crust
The first step in creating your No-Bake Banana Cream Pie Cups is to prepare the graham cracker crust. This crust forms the base of your dessert and is integral to its overall flavor and texture.
1. Ingredients for the Crust: Gather your graham cracker crumbs, unsalted butter, and sugar. Typically, a combination of about one and a half cups of graham cracker crumbs, four tablespoons of melted butter, and two tablespoons of sugar will suffice for approximately six servings.
2. Mixing the Ingredients: In a medium-sized mixing bowl, combine the graham cracker crumbs and sugar. Pour in the melted butter, and mix well until the crumbs are evenly coated and the mixture resembles wet sand. This step is essential for ensuring that the crust holds together when pressed into the cups.
3. Pressing the Crust into Cups: To assemble the crust, use small dessert cups or jars for serving. Spoon the graham cracker mixture evenly into each cup, filling them about one-third of the way full. Using the back of a spoon or your fingers, press the mixture down firmly to create an even layer. This technique helps to form a stable foundation for the rest of the dessert, ensuring that the crust won’t crumble when you add the filling.
4. Chilling the Crust: Once you have pressed the crust into the cups, place them in the refrigerator for about 10 to 15 minutes. Chilling the crust allows it to firm up slightly, making it easier to layer the pudding and bananas on top.
Assembling the Cups
Once the crust is prepared and chilled, it’s time to assemble the layers of your No-Bake Banana Cream Pie Cups.
1. Layering the Ingredients: Begin by slicing your ripe bananas into thin rounds. You will want enough banana slices to layer in each cup, typically about half a banana per serving. Start by placing a layer of banana slices directly on top of the chilled crust.
2. Creating the Pudding Filling: Next, prepare the instant vanilla pudding according to package instructions. In a medium bowl, combine the instant pudding mix with cold milk, whisking for about two minutes until it thickens. For a creamier consistency, you can add a bit more milk, but be cautious not to overdo it, as you want the pudding to hold its shape.
3. Adding the Pudding to the Cups: Once the pudding has reached the desired consistency, spoon it over the layer of bananas in each cup, filling them to the top. The pudding should cover the bananas completely, ensuring they stay fresh and preventing browning.
4. Topping with Whipped Topping: For an extra touch of decadence, add a dollop of whipped topping on top of each cup. This not only enhances the visual appeal but also adds a light and airy texture that balances the richness of the pudding and bananas.
5. Garnishing for Presentation: If desired, sprinkle crushed graham crackers on top of the whipped topping for added texture and visual appeal. You can also add a few banana slices to the top for a beautiful finish that showcases the key ingredient.
Creating the Perfect Pudding
We’ve covered the crust and assembly, but the heart of these No-Bake Banana Cream Pie Cups is undoubtedly the creamy pudding filling. To achieve the ideal thickness and flavor, it’s important to follow these steps carefully.
1. Choosing the Right Pudding Mix: While instant vanilla pudding is the standard choice, consider using a high-quality brand to ensure the best flavor. Some variations may even include flavors like banana cream or cheesecake for a unique twist on the classic.
2. Mixing the Pudding: In a clean bowl, combine the instant pudding mix with cold milk. Use a whisk to blend the ingredients thoroughly. Whisking vigorously for the first minute helps to incorporate air, which contributes to a light and fluffy texture.
3. Achieving the Right Thickness: The key to perfect pudding is ensuring it thickens properly. After mixing, let the pudding sit for a few minutes. This allows it to set, resulting in a smooth and creamy filling that will hold up well in your dessert cups.
4. Incorporating Flavor Enhancements: To elevate the flavor of your pudding, consider adding a teaspoon of vanilla extract during the mixing process. This simple addition can make a significant difference, adding depth and a beautifully aromatic quality to the filling.
By following these steps, you can create delightful No-Bake Banana Cream Pie Cups that are not only easy to prepare but also a guaranteed hit at any gathering. The combination of creamy pudding, fresh bananas, and a crunchy graham cracker crust creates a symphony of flavors and textures that will leave your guests asking for seconds.
The Importance of Adding Vanilla Extract for Enhanced Flavor
Vanilla extract is a game-changer when it comes to flavoring desserts, and adding it to your banana cream pie cups is no exception. This key ingredient not only enhances the overall taste but also complements the natural sweetness of the bananas and the creaminess of the pudding. When selecting a vanilla extract, opt for pure vanilla extract over imitation versions, as it provides a richer and more authentic flavor profile. Just a teaspoon mixed into your pudding mixture will elevate your dessert, making each spoonful a delightful experience.
Incorporating Whipped Topping
Best Practices for Folding in Whipped Topping to Maintain a Light Texture
Incorporating whipped topping is essential for achieving that light and airy texture that banana cream pie is known for. To do this effectively, you should use a gentle folding technique. Start by adding a small amount of whipped topping to the pudding mixture and stir to lighten the pudding. Then, with a spatula, gently fold in the remaining whipped topping in a circular motion, lifting from the bottom of the bowl to the top. This method helps retain the airiness of the whipped topping, ensuring your pie cups remain fluffy and not dense.
Achieving a Smooth and Creamy Pudding Mixture
To achieve a smooth and creamy pudding mixture, make sure that your pudding base is well-prepared before adding the whipped topping. Whisk the pudding mix and milk together thoroughly until it thickens, ensuring there are no lumps. If you notice any lumps, you can use an immersion blender or a standard blender to smoothen the mixture before folding in the whipped topping. This step is crucial as it contributes to the overall texture of the banana cream pie cups.
Layering the Ingredients
Techniques for Layering the Pudding and Banana Slices for Visual Appeal
Layering is where the magic happens in your no-bake banana cream pie cups. Start by spooning a layer of the creamy pudding mixture into the bottom of each cup. Next, add a layer of banana slices, making sure they are evenly distributed. You can use a combination of fresh banana slices and a sprinkle of banana pudding mix for added flavor and visual interest. Repeat the process until the cups are filled, finishing with a layer of pudding on top. This not only creates an appealing visual effect but also ensures that each bite is packed with flavor.
Suggestions for Creating an Aesthetically Pleasing Presentation
Presentation is key when it comes to desserts. To enhance the visual appeal of your banana cream pie cups, consider using clear cups or jars that allow the layers to be seen. You can also garnish the top layer with additional banana slices, a dollop of whipped topping, and a sprinkle of crushed graham crackers or a dusting of cocoa powder. For an extra touch, consider adding a mint leaf on top for a pop of color. These small details can elevate your dessert from simple to stunning.
Chilling for Best Results
The Science Behind Refrigeration: How Chilling Helps Set the Dessert
Refrigeration is a crucial step in preparing your no-bake banana cream pie cups. Chilling allows the pudding to set properly, resulting in a firmer texture that holds together well when served. This process also helps meld the flavors together, enriching the overall taste. The cool temperature enhances the creamy, refreshing quality of the dessert, making it a perfect treat for warm days.
Recommended Chilling Time for Optimal Texture
For the best texture and flavor, cover your banana cream pie cups with plastic wrap or a lid and refrigerate them for at least 2 to 4 hours. If possible, allow them to chill overnight. This longer chilling time will yield a firmer pudding and a more cohesive flavor profile, ensuring a delightful experience when you finally dig in.
Garnishing Your Dessert
Creative Ways to Garnish the Cups for an Inviting Finish
Garnishing your banana cream pie cups is not just about aesthetics; it enhances the overall eating experience. Consider topping each cup with a generous dollop of whipped topping, a few banana slices, and a sprinkle of crushed graham crackers. For added flair, you can drizzle some chocolate syrup or caramel sauce over the top. These garnishes add texture and flavor, making each cup even more appealing.
The Role of Garnishes in Elevating the Dessert’s Visual Presentation and Flavor
Garnishes play a significant role in how a dessert is perceived. They can elevate the visual presentation, making your banana cream pie cups look more gourmet and inviting. Furthermore, the added flavors from garnishes can complement the main ingredients, creating a more complex taste experience. A well-garnished dessert is not only more enjoyable to eat but also creates a memorable impression on your guests.
Nutritional Insights of Banana Cream Pie Cups
Analyzing the Nutritional Value
Understanding the nutritional value of your dessert can help you enjoy it mindfully. Each cup of banana cream pie contains a variety of key nutrients. Bananas are rich in potassium, vitamin C, and dietary fiber, contributing to heart health and digestive wellness. The pudding and whipped topping provide a source of calcium and protein, although they do contain added sugars and fats.
Health Benefits of Bananas and Moderation in Dessert Consumption
Bananas are a nutritional powerhouse, offering numerous health benefits. Their high fiber content helps maintain digestive health, while potassium is essential for heart function and muscle contraction. However, like all desserts, moderation is key. Enjoying your banana cream pie cups as an occasional treat can satisfy your sweet tooth without compromising your health goals.
Why No-Bake Desserts Are Perfect for Any Occasion
The Appeal of No-Bake Recipes
No-bake desserts are increasingly popular for their convenience and time-saving aspects. They require minimal preparation and cooking time, making them ideal for busy cooks or last-minute gatherings. With no baking involved, you eliminate the need to preheat the oven or monitor baking times, allowing you to focus on other aspects of your event.
Versatility of No-Bake Recipes for Various Events and Gatherings
One of the greatest advantages of no-bake recipes is their versatility. Whether you’re hosting a birthday party, a summer barbecue, or simply enjoying a cozy family dinner, these desserts can adapt to any occasion. They can be made ahead of time, stored in the refrigerator, and served chilled, ensuring that you have a delicious treat ready to impress your guests whenever needed.
Conclusion
No-Bake Banana Cream Pie Cups are not only simple to prepare but also deliver a deliciously satisfying experience for dessert lovers. With a harmonious blend of flavors and textures, this dessert is sure to please both kids and adults alike. Whether you’re hosting a gathering or just looking for a sweet treat to enjoy at home, these cups provide an effortless way to indulge in a classic favorite. By following the detailed steps outlined above, anyone can whip up a batch of these delightful treats and impress their family and friends. Enjoy the creamy, fruity, and crunchy goodness that defines this classic dessert in a modern, easy-to-serve format.
