Zesty Lemon Glazed Turkey: A Flavorful Holiday Delight
As the holiday season approaches, the kitchen transforms into a bustling hub of activity, filled with the aromas of traditional recipes and joyful gatherings. Among the many iconic dishes that grace our tables during this festive time, the turkey stands out as a centerpiece, embodying the spirit of celebration. While classic roast turkey recipes have their charm, introducing a unique and flavorful twist can elevate your holiday feast to new heights. Enter the Zesty Lemon Glazed Turkey—a dish that not only captures the essence of the season but also tantalizes the taste buds with its vibrant flavors and aromatic qualities.
The Zesty Lemon Glazed Turkey is a refreshing take on the traditional roasted turkey, infusing the bird with a bright, zesty flavor that is sure to impress your family and friends. This recipe combines the richness of poultry with the invigorating taste of fresh lemons, creating a delightful contrast that dances on the palate. The use of honey and Dijon mustard adds a touch of sweetness and tanginess, while fresh herbs like thyme and rosemary provide earthy undertones, making this turkey a true crowd-pleaser. Ideal for holiday gatherings, family celebrations, or any special occasion, this turkey dish is bound to become a cherished recipe in your culinary repertoire.
Understanding the Ingredients
To successfully prepare the Zesty Lemon Glazed Turkey, it’s essential to understand the key ingredients that contribute to its delicious flavor profile. The star of the dish is, of course, the turkey itself. A whole turkey weighing between 12 to 14 pounds is recommended, as this size allows for even cooking and ample serving for a gathering. When selecting your turkey, consider opting for a fresh or organic bird, as this can positively impact the overall flavor and texture of your dish.
Butter plays a crucial role in this recipe, serving as the base for the glaze. Its rich, creamy texture not only enhances the flavor but also helps to achieve that golden-brown, crispy skin that everyone loves. Using unsalted butter allows you to control the saltiness of the dish, ensuring a balanced flavor throughout.
Fresh lemons are another key ingredient, providing both zest and juice. The zest, which is the outer yellow rind of the lemon, contains essential oils that release a bright, citrusy aroma. When combined with the juice, it creates a tangy balance that cuts through the richness of the turkey. Using fresh lemons instead of bottled juice is recommended, as it offers a more vibrant and authentic flavor.
In addition to the lemons, honey and Dijon mustard play pivotal roles in balancing the flavors of the glaze. Honey adds a natural sweetness that complements the tartness of the lemons, while Dijon mustard introduces a subtle tang, enhancing the overall complexity of the dish. The interplay of these ingredients creates a glaze that is both sweet and savory, ensuring that each bite of turkey is bursting with flavor.
Herbs are essential for adding depth to the dish, and in this recipe, fresh thyme and rosemary are used to infuse the turkey with aromatic qualities. These herbs not only enhance the flavor of the meat but also contribute to the overall fragrance of the dish as it roasts in the oven. Additionally, garlic powder and black pepper are added for seasoning, providing a savory depth that rounds out the flavor profile.
Finally, low-sodium chicken broth is necessary for keeping the turkey moist during roasting. It enhances the flavor of the bird while preventing it from drying out, ensuring a juicy and succulent result. Using low-sodium broth allows you to control the saltiness of the dish, resulting in a well-balanced meal.
Preparation of the Turkey
Now that we have a good understanding of the ingredients, it’s time to prepare the turkey for roasting. Proper preparation is key to achieving a beautifully roasted bird with crispy skin and tender meat.
Start by preheating your oven to 325°F (165°C). While the oven is heating, remove the turkey from its packaging and check the cavity for any giblets or neck pieces that may be included. These can be set aside for making gravy or discarded if you prefer. Rinse the turkey under cold water to remove any residual juices, then pat it dry with paper towels. This step is crucial, as removing moisture from the skin will help achieve that desired crispy finish during roasting.
Next, ensure the cavity of the turkey is clear and ready for seasoning. You can season the inside of the turkey with salt and pepper for added flavor. This step is often overlooked, but seasoning the cavity will enhance the taste of the meat as it cooks.
Once the turkey is prepped, it’s time to apply a generous amount of butter under the skin. Gently separate the skin from the meat, being careful not to tear it. Using softened butter, spread it evenly beneath the skin over the breast and thighs. This technique not only flavors the meat but also helps keep it moist during cooking.
After buttering the skin, you can proceed to season the outside of the turkey. A simple mixture of salt, pepper, garlic powder, and herbs can be rubbed all over the turkey, ensuring even coverage. This seasoning will create a flavorful crust as the turkey roasts in the oven.
With the turkey fully prepared, it is now ready to receive the zesty lemon glaze that will infuse it with flavor and moisture.
Creating the Lemon Glaze
To create the zesty lemon glaze, gather the following ingredients: melted butter, fresh lemon juice, lemon zest, honey, Dijon mustard, chopped fresh thyme, and chopped fresh rosemary. The combination of these ingredients is what will give your turkey its unique flavor and tantalizing aroma.
Start by melting approximately one cup of unsalted butter in a saucepan over low heat. Once melted, remove it from the heat and let it cool slightly before adding the other ingredients. Add in the zest of two to three lemons, followed by the juice of those same lemons. Be sure to strain the juice to remove any seeds for a smooth glaze. The fresh lemon juice will provide the tartness that balances the sweetness of the honey and the tang of the mustard.
Next, stir in about half a cup of honey and a quarter cup of Dijon mustard. Whisk the mixture until smooth, ensuring that all the ingredients are well combined. The consistency should be syrupy and slightly thick, which will help it adhere to the turkey during roasting.
Now, fold in the chopped fresh thyme and rosemary. These herbs will not only contribute flavor but also add a beautiful visual appeal to the glaze. Finally, season the mixture with salt and black pepper to taste. The glaze is now ready to be used, and it will serve as the final touch that elevates your turkey to a new level of deliciousness.
Applying the Glaze: Techniques for Maximum Flavor
With the turkey prepared and the zesty lemon glaze ready, it’s time to apply the glaze to the turkey. This step is crucial for ensuring that the flavors penetrate the meat and create a beautifully caramelized exterior.
Using a basting brush, generously apply the glaze all over the turkey, ensuring that every surface is coated. Pay special attention to the breast and the drumsticks, as these areas benefit greatly from the glaze’s flavor and moisture. If there is any glaze remaining in the bowl, reserve it for basting the turkey during the roasting process.
Once the turkey is fully coated in the glaze, place it in a roasting pan. For optimal cooking, consider using a roasting rack to elevate the turkey, allowing hot air to circulate around it. This not only helps the turkey cook evenly but also promotes that coveted crispy skin.
As the turkey roasts, baste it with the reserved glaze every 30-40 minutes. This will enhance the flavor and help achieve a beautiful, glossy finish. Ensure that the internal temperature of the turkey reaches a safe 165°F (74°C) in the thickest part of the thigh for optimal safety and tenderness.
Stay tuned for the next part of this article, where we will delve into the roasting process and the delightful side dishes that pair perfectly with your Zesty Lemon Glazed Turkey.
Techniques for Loosening the Skin Without Tearing
To achieve the perfect Zesty Lemon Glazed Turkey, it is essential to loosen the skin without tearing it. This technique allows the glaze to penetrate the meat, ensuring maximum flavor and moisture. Here are a few methods to effectively loosen the skin:
1. Use Your Fingers: Gently slide your fingers under the skin at the neck end of the turkey. Begin by lifting the skin slightly and working your way down towards the breast. Be cautious not to pull too hard to avoid tearing the skin.
2. Employ a Spoon: If you’re struggling with your fingers, a wooden spoon handle can help. Insert the spoon between the skin and the meat and gently push it down, loosening the skin as you go.
3. Be Gentle: Always be gentle during this process. Rushing or using excessive force can lead to rips, which could compromise the juicy goodness of the turkey.
Importance of Thorough Application Both Under the Skin and on the Surface
Once the skin is loosened, the next step is to apply the zesty lemon glaze. It is crucial to ensure that the glaze is evenly distributed both under the skin and on the surface. This technique enhances flavor penetration, making every bite of turkey bursting with zesty goodness. Here’s how to do it:
– Under the Skin: Use a spoon or your fingers to spread the glaze evenly beneath the skin. Focus on the breast and thigh areas, as these sections benefit the most from the flavor infusion.
– On the Surface: After coating the inside of the skin, generously brush the remaining glaze over the turkey’s exterior. This will create a beautiful caramelized crust while roasting.
Preparing for Roasting: Ensuring Juiciness and Flavor
Setting up your turkey properly for roasting is vital for achieving juicy and flavorful meat. Here are key guidelines to follow:
Guidelines on Setting Up the Turkey for Roasting
1. Use a Roasting Rack: Place the turkey on a roasting rack inside a large roasting pan. This allows hot air to circulate around the turkey, promoting even cooking and crisp skin.
2. Elevate the Turkey: If you don’t have a roasting rack, you can create a makeshift one by arranging vegetables, such as carrots, onions, and celery, at the bottom of the pan. This not only elevates the turkey but also infuses additional flavor into the drippings.
The Role of a Roasting Rack and Pan for Even Cooking
A sturdy roasting rack is essential for achieving even cooking. The rack keeps the turkey above the pan, allowing fat to drip away and ensuring that the skin crisps up nicely. Always choose a pan that is large enough to accommodate the turkey and catch all the flavorful juices.
Importance of Adding Chicken Broth to Maintain Moisture
Adding chicken broth to the bottom of the roasting pan is a game-changer. This technique helps maintain moisture during the roasting process and adds a delicious flavor to the drippings, which can be used for gravy. Pour about 1-2 cups of low-sodium chicken broth into the pan before placing the turkey on the rack.
Suggestions for Seasoning the Turkey Cavity and Adding Aromatics
Before roasting, season the turkey cavity generously with salt and pepper. For an added flavor boost, fill the cavity with aromatics such as:
– Lemon Halves: The citrus complements the glaze and adds brightness.
– Garlic Cloves: Whole cloves infuse the turkey with rich flavor.
– Fresh Herbs: Thyme, rosemary, and sage are excellent choices that pair perfectly with turkey.
Roasting the Turkey: Timing and Temperature
Proper roasting times and temperature control are crucial for a perfectly cooked turkey. Here’s what you need to know:
Explanation of Roasting Times and Temperature Control
The general rule of thumb is to roast the turkey for about 13-15 minutes per pound at 325°F (163°C). For example, a 14-pound turkey would take approximately 2.5 to 3 hours to cook. Always refer to a reliable cooking chart for specific guidelines based on the weight of your turkey.
Recommendations for Using a Meat Thermometer to Ensure Doneness
To guarantee that your turkey is safely cooked, a meat thermometer is a must-have tool. Insert the thermometer into the thickest part of the thigh without touching the bone. The turkey is considered done when the internal temperature reaches 165°F (74°C). This ensures that the meat is both safe to eat and perfectly juicy.
Tips on How to Cover and Uncover the Turkey for Optimal Browning
To achieve a beautifully browned turkey, consider these tips:
– Start Covered: Roast the turkey covered with aluminum foil for the first hour or so. This helps trap moisture and prevents the skin from burning.
– Uncover for Browning: After about an hour, remove the foil to allow the skin to crisp up. Keep an eye on it to ensure it doesn’t over-brown. If necessary, cover it loosely again with foil until it reaches the desired color.
Basting: Keeping the Turkey Moist
Basting the turkey is essential for keeping it moist and enhancing flavor throughout the cooking process. Here’s how to do it effectively:
Importance of Basting Throughout the Cooking Process
Basting involves spooning the pan drippings over the turkey every 30-45 minutes. This not only adds flavor but also helps to keep the meat moist during roasting.
Recommended Frequency for Basting and Techniques to Enhance Flavor
– Frequency: Baste the turkey at least every 30 minutes after the first hour of roasting.
– Technique: Use a baster or a ladle to scoop up the drippings from the pan, then drizzle them over the turkey. For an added flavor kick, include a bit of the lemon glaze into the basting liquid during the last hour of roasting.
Resting the Turkey: The Key to Tender Meat
After roasting, it’s crucial to let the turkey rest before carving. This step is often overlooked but is essential for a delicious final product.
Discuss the Significance of Resting the Turkey Post-Roasting
Resting allows the juices to redistribute throughout the meat, resulting in a more succulent turkey. If you carve the turkey immediately after roasting, the juices will run out, leaving you with dry meat.
Explanation of How Resting Redistributes Juices for a More Succulent Final Product
Tent the turkey loosely with aluminum foil and let it rest for at least 20-30 minutes before carving. This time allows the proteins to relax, ensuring that each slice is juicy and tender.
Carving and Serving: Presentation Matters
Once your turkey has rested, it’s time to carve and serve. Presentation is key to making your Zesty Lemon Glazed Turkey an eye-catching centerpiece.
Step-by-Step Instructions on How to Carve the Turkey Effectively
1. Remove the Legs: Start by cutting through the skin between the thigh and the body. Bend the leg back until the joint pops, then cut through the joint to remove the leg. Repeat on the other side.
2. Carve the Breast: Using a sharp carving knife, slice down along the breastbone to remove the breast meat. Slice the breast into even pieces.
3. Serve the Thighs: The thigh meat is often the juiciest, so be sure to serve it alongside the breast for a well-rounded plate.
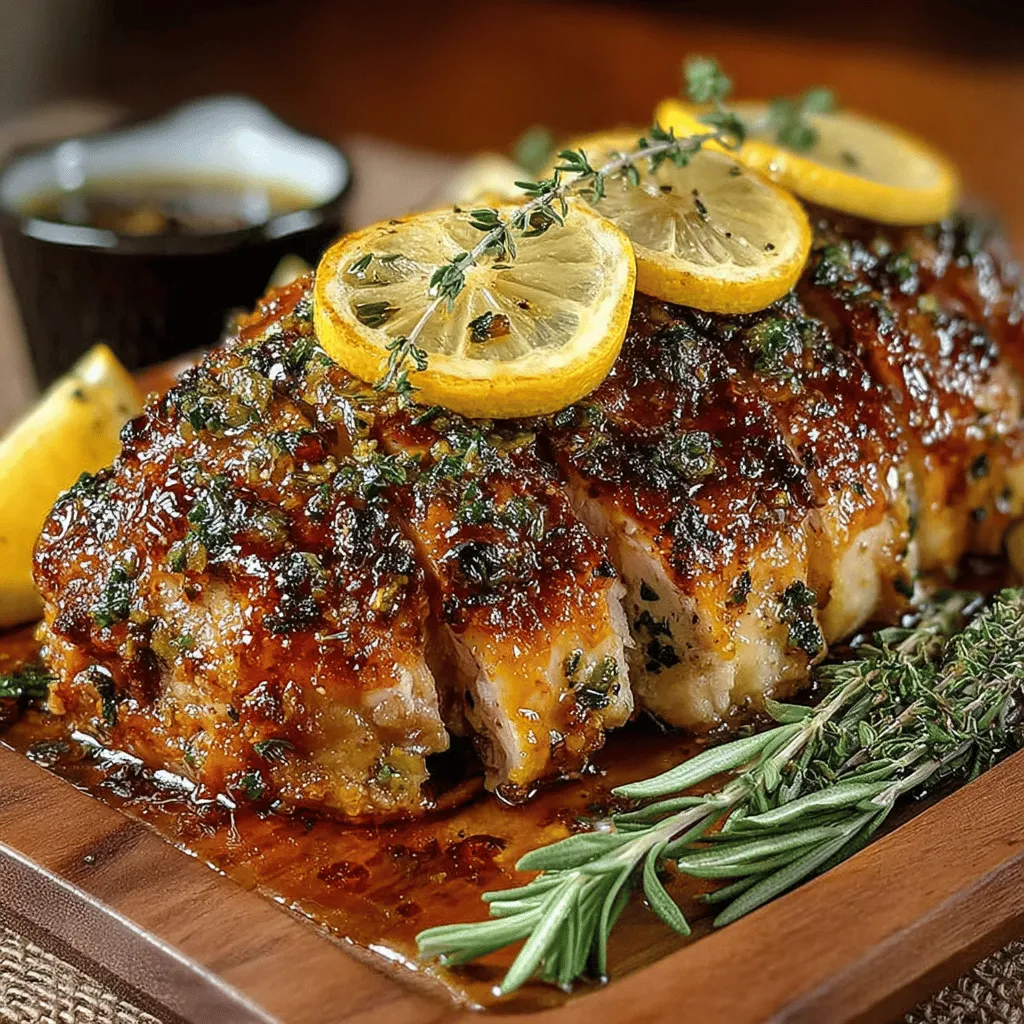
Tips for Serving Beautifully with Garnishes Like Lemon Slices and Thyme Sprigs
For an appealing presentation, arrange the carved turkey on a large platter. Garnish with fresh lemon slices and sprigs of thyme. This not only enhances the visual appeal but also hints at the delicious flavors of the dish.
Suggestions for Using Pan Juices to Enhance Flavor When Serving
Don’t forget about the flavorful pan juices! Strain the drippings from the roasting pan and serve them as gravy or drizzle over the turkey slices for added moisture and flavor.
Conclusion
The Zesty Lemon Glazed Turkey is more than just a dish; it’s a culinary centerpiece that can elevate any holiday meal. With its bright flavors and succulent meat, this turkey is sure to impress your family and friends, creating lasting memories around the dinner table. Embrace this flavorful dish as part of your culinary repertoire, and watch it become a cherished favorite during festive gatherings. Whether it’s Thanksgiving or any special occasion, this turkey recipe is destined to shine and leave everyone asking for seconds.