
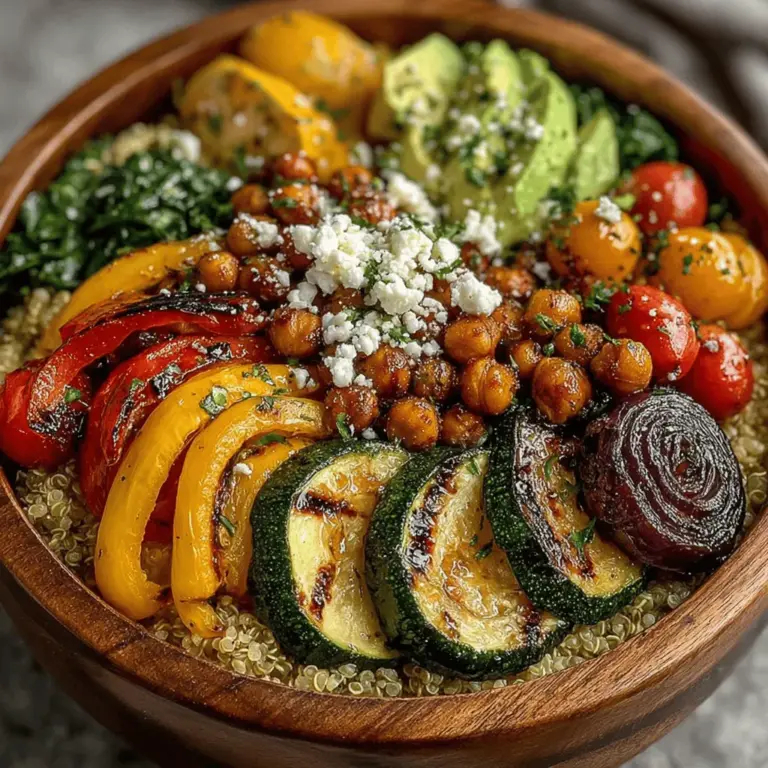
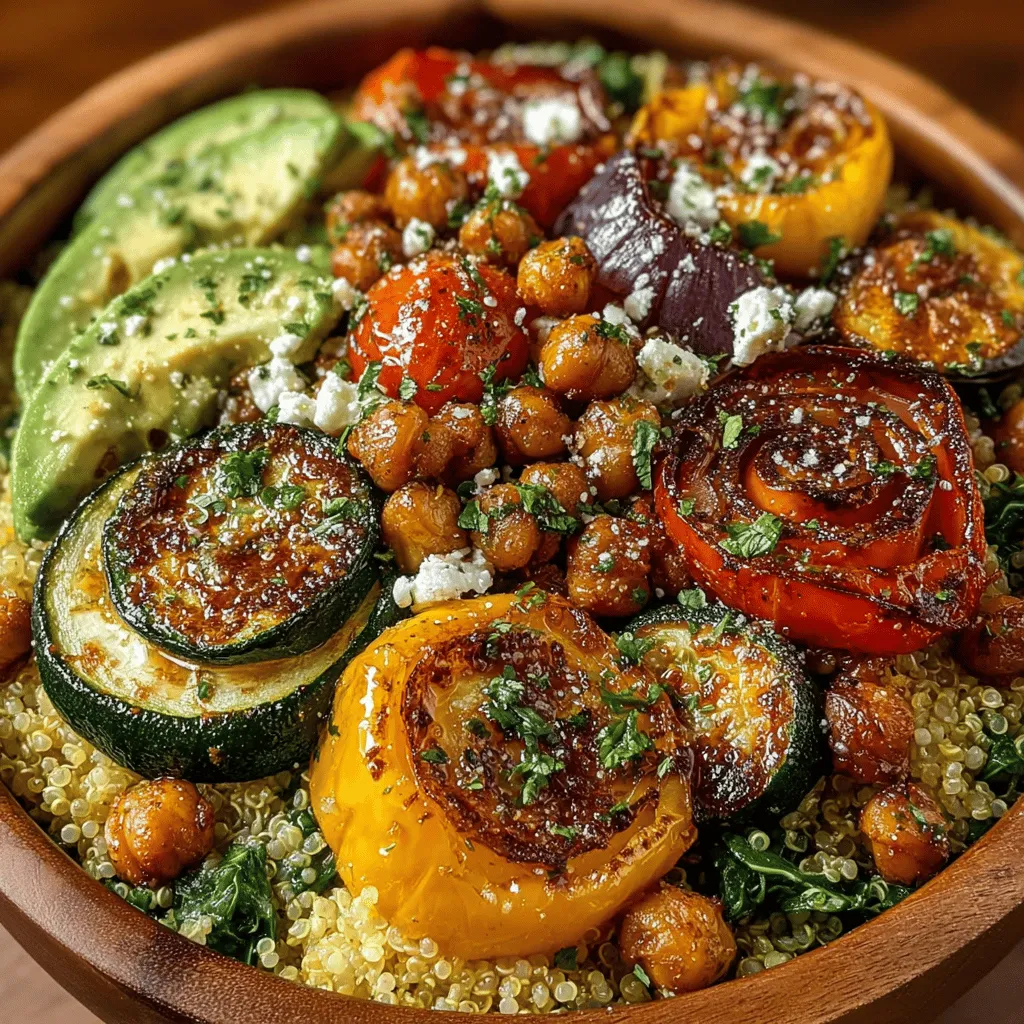
Introduction to Vibrant Quinoa and Roasted Veggie Power Bowls
In the realm of healthy eating, power bowls have quickly become a beloved choice for those looking to enjoy a nutritious and satisfying meal. These bowls are not only visually appealing, but they also offer a balanced combination of flavors, textures, and essential nutrients that cater to diverse dietary preferences. Among the myriad of power bowl recipes, the Vibrant Quinoa and Roasted Veggie Power Bowls stand out as a particularly nourishing and colorful option. This article serves as a comprehensive guide to crafting this delightful dish, celebrating its health benefits, detailing the ingredients, and providing step-by-step preparation instructions.
The Health Benefits of Power Bowls
Understanding the nutritional value of each component in a power bowl is crucial for appreciating its health benefits. The Vibrant Quinoa and Roasted Veggie Power Bowls are packed with wholesome ingredients that contribute to overall well-being.
Nutritional Overview of Quinoa
Quinoa, often hailed as a superfood, is the star of our power bowl. This ancient grain is not only rich in protein and fiber but also contains all nine essential amino acids, making it a complete source of protein for vegetarians and vegans. Additionally, quinoa is a gluten-free alternative to traditional grains, catering to those with gluten sensitivities. By incorporating quinoa into your diet, you can enjoy sustained energy levels and improved digestive health, thanks to its high fiber content.
Benefits of Roasted Vegetables
Roasting vegetables enhances their natural flavors through caramelization, creating a delicious depth that elevates the overall taste of the power bowl. The process of roasting also helps to retain the vitamins and minerals found in vegetables such as zucchini, bell peppers, red onion, and cherry tomatoes. These vibrant vegetables provide essential nutrients like vitamin C, potassium, and antioxidants, all of which play a vital role in supporting a healthy immune system and reducing inflammation.
Role of Chickpeas in Your Diet
Chickpeas are another essential ingredient in our power bowl, serving as an excellent source of plant-based protein. They are rich in iron and folate, which are crucial for maintaining healthy blood levels and supporting energy metabolism. Additionally, chickpeas have been shown to promote heart health and aid in weight management, making them a valuable addition to any meal. Their nutty flavor and satisfying texture complement the other ingredients beautifully, creating a balanced and hearty dish.
The Importance of Fresh Greens
No power bowl is complete without a generous helping of fresh greens. Baby spinach or arugula not only adds a vibrant splash of color but also contributes a wealth of antioxidants and vitamins to the dish. These leafy greens are hydrating and low in calories, making them an excellent choice for anyone looking to enhance their overall wellness. Incorporating fresh greens into your power bowl not only boosts its nutritional profile but also provides a refreshing crunch that contrasts beautifully with the roasted vegetables and quinoa.
Gathering Your Ingredients
To ensure a successful cooking experience, it’s essential to gather all the ingredients needed for your Vibrant Quinoa and Roasted Veggie Power Bowls. Below, we provide a detailed breakdown of the key ingredients that will come together to create this delicious meal.
Essential Ingredients for the Power Bowl
– Quinoa: The foundation of the bowl, providing protein and fiber.
– Vegetable broth or water: Used to cook the quinoa, enhancing its flavor.
– Fresh vegetables: A mix of zucchini, bell peppers, red onion, and cherry tomatoes for a colorful and nutritious base.
– Olive oil and spices: Garlic powder, smoked paprika, salt, and black pepper to season the roasted vegetables.
– Chickpeas: Canned or cooked, these legumes add protein and a satisfying texture.
– Fresh avocado and greens: Baby spinach or arugula to add creaminess and a nutrient boost.
– Optional toppings: Feta cheese and fresh herbs for added flavor and presentation.
Preparation Steps for the Perfect Power Bowl
A clear and concise set of instructions is essential for guiding you through the preparation of your Vibrant Quinoa and Roasted Veggie Power Bowls. Follow these steps to ensure a successful and enjoyable cooking experience.
Preheat the Oven for Roasting
Begin by preheating your oven to 425°F (220°C). This optimal roasting temperature will help achieve perfectly caramelized vegetables that are tender on the inside and slightly crispy on the outside. Preheating ensures that the vegetables will cook evenly and develop rich flavors, making them the highlight of your power bowl.
As you wait for the oven to heat up, you can start preparing the quinoa and vegetables, setting the stage for a delicious meal that is both visually appealing and packed with nutrients.
Importance of Preheating for Even Cooking
Before diving into the specifics of cooking quinoa and preparing vegetables, it’s crucial to highlight the significance of preheating your oven. Preheating ensures that your vegetables roast evenly and develop a caramelized exterior while maintaining a tender interior. This step is essential for enhancing the overall flavor and texture of your power bowls. A properly preheated oven allows for the perfect balance of heat during the roasting process, resulting in vibrant colors and delicious flavors that make your power bowls truly stand out.
Cooking the Quinoa
Step-by-Step Guide on How to Cook Quinoa Properly
Cooking quinoa is a straightforward process, but precision is key to achieving that perfect fluffy texture. Here’s how to do it:
1. Rinse the Quinoa: Start by measuring out 1 cup of quinoa. Place it in a fine-mesh strainer and rinse under cold water for about 2 minutes. This step removes any bitter saponins naturally found on the quinoa’s outer coating.
2. Combine with Water: In a medium saucepan, add the rinsed quinoa along with 2 cups of water or vegetable broth for added flavor.
3. Bring to a Boil: Place the saucepan on medium-high heat and bring the mixture to a rolling boil.
4. Simmer and Cover: Once boiling, reduce the heat to low and cover the saucepan with a tight-fitting lid. Allow the quinoa to simmer for about 15 minutes.
5. Let it Rest: After 15 minutes, remove the saucepan from heat but keep it covered. Let it sit for an additional 5 minutes to allow the quinoa to steam and absorb any remaining liquid.
6. Fluff with a Fork: Finally, remove the lid and fluff the quinoa gently with a fork. This step helps separate the grains, making it light and airy.
Tips for Achieving Fluffy Quinoa
– Correct Water Ratio: The standard water-to-quinoa ratio is 2:1. However, you can adjust slightly based on personal preference for texture.
– Soaking: For even fluffier quinoa, soak it in water for 30 minutes before rinsing. This can help soften the grains and make them cook more evenly.
– Broth for Flavor: Cooking quinoa in vegetable broth instead of water adds depth to its flavor profile, enhancing the overall taste of your power bowls.
Preparing and Seasoning the Vegetables
Chopping Techniques for Even Cooking
The way you chop your vegetables plays a vital role in achieving even cooking. Here are some effective techniques:
– Uniform Size: Cut your vegetables into similar sizes (about 1-inch pieces) to ensure they cook at the same rate. This means that no piece will be undercooked while another is burnt.
– Use a Sharp Knife: A sharp knife not only makes the chopping process easier but also ensures cleaner cuts, which can enhance the appearance of your dish.
The Significance of Seasoning and Oil in Enhancing Flavor
Seasoning is essential for elevating the flavors of your roasted vegetables. Here’s how to effectively season them:
– Olive Oil: Drizzle your chopped vegetables with a generous amount of extra virgin olive oil. This not only helps with roasting but also adds healthy fats to your dish.
– Herbs and Spices: Sprinkle your vegetables with salt, pepper, garlic powder, smoked paprika, or your choice of herbs. These spices will infuse the veggies with aromatic flavors as they roast.
Roasting to Perfection
Timing and Temperature for Optimal Vegetable Texture
For optimal roasting, preheat your oven to 425°F (220°C). This high temperature allows vegetables to caramelize beautifully. Here’s a general guideline for roasting times:
– Root Vegetables (carrots, sweet potatoes, beets): 25-30 minutes
– Cruciferous Vegetables (broccoli, cauliflower): 20-25 minutes
– Soft Vegetables (zucchini, bell peppers): 15-20 minutes
Tips for Monitoring the Roasting Process
– Tossing Halfway: To ensure even browning, toss your vegetables halfway through the roasting process.
– Visual Cues: Look for a golden-brown color and a slight crispness on the edges, indicating that they are perfectly roasted.
Incorporating Chickpeas
Timing for Adding Chickpeas to Maximize Flavor and Texture
Chickpeas are a fantastic addition to power bowls, providing protein and fiber. To maximize their flavor and texture:
– Roast Chickpeas Separately: For optimal crispiness, consider roasting chickpeas separately on a baking sheet. Toss them with olive oil, salt, and spices, and roast them for 20-25 minutes alongside your vegetables.
Benefits of Roasting Chickpeas Alongside Vegetables
Roasting chickpeas with vegetables contributes to a harmonious blend of flavors. As they roast, they absorb the aromatic scents from the vegetables, enhancing their taste. Additionally, the crunchiness of roasted chickpeas pairs perfectly with the tender texture of the veggies, adding a delightful contrast.
Assembling the Bowls
Layering Techniques for Visual Appeal and Flavor Distribution
When assembling your power bowls, the way you layer the ingredients can enhance both the visual appeal and the flavor profile. Here’s how to do it:
1. Base Layer: Start with a generous scoop of fluffy quinoa at the bottom of your bowl.
2. Vegetable Layer: Next, artfully arrange your roasted vegetables on top of the quinoa. Consider using a variety of colors and textures for visual interest.
3. Chickpea Inclusion: Add a handful of roasted chickpeas to one side of the bowl for a pop of flavor and protein.
Suggestions for Customizing Each Bowl According to Taste
One of the best aspects of power bowls is their versatility. Here are some ideas for customization:
– Add Greens: Incorporate fresh spinach or kale for added nutrients.
– Protein Boost: Include grilled chicken, tofu, or a poached egg for a protein-packed meal.
– Grains: Substitute quinoa with brown rice, farro, or bulgur for variations in texture.
Garnishing Your Power Bowls
Enhancing Flavor and Presentation Through Garnishing Techniques
Garnishing your power bowls not only enhances their appearance but also adds layers of flavor. Here are some key garnishing techniques to consider:
– Drizzling: A drizzle of tahini or your favorite dressing over the top can make the bowl look more appetizing and add a delightful creaminess.
– Sprinkling: Add a sprinkle of seeds or nuts for an extra crunch.
Choosing the Right Garnishes
– Avocado for Creaminess: Sliced avocado provides a rich, creamy texture that complements the other ingredients beautifully.
– Feta Cheese for a Tangy Kick: Crumbled feta adds a salty, tangy element that elevates the overall flavor.
– Fresh Lemon Juice for Brightness: A squeeze of fresh lemon juice brightens the dish, enhancing the flavors of the roasted veggies.
– Fresh Herbs for Added Depth: Fresh herbs like parsley, cilantro, or basil can bring a burst of freshness and complexity to the dish.
Serving Suggestions
Enjoying Them Warm or at Room Temperature
Power bowls can be enjoyed warm right out of the oven or at room temperature. This flexibility makes them perfect for meal prep or potlucks. If serving warm, allow the bowls to cool slightly to ensure that the flavors meld beautifully.
Pairing Options with Dressings and Sauces
To elevate your power bowls even further, consider pairing them with a delicious dressing. A lemon-tahini dressing, balsamic vinaigrette, or a spicy sriracha sauce can add an extra layer of flavor that ties all the ingredients together.
Storing Leftovers
Proper Storage Techniques
Power bowls are perfect for meal prep, and knowing how to store leftovers properly is essential for maintaining freshness:
– Refrigeration: Store leftovers in airtight containers in the fridge. They should last for up to 3-4 days.
– Separation: Keep the quinoa, roasted vegetables, and garnishes separate until you are ready to eat to prevent sogginess.
Recommended Storage Containers
Use glass containers with tight-fitting lids to store your power bowls. Glass is non-toxic, microwave-safe, and helps maintain the quality of your food.
Conclusion
Vibrant Quinoa and Roasted Veggie Power Bowls are a delightful way to incorporate a variety of nutritious ingredients into your diet. With easy-to-follow instructions and an emphasis on health benefits, this dish not only provides a satisfying meal but also nourishes the body. Whether enjoyed as a quick lunch or a cozy dinner, these power bowls are sure to become a staple in your culinary repertoire. Enjoy the vibrant colors, textures, and flavors of this wholesome dish while reaping its many nutritional rewards. Embrace the versatility of power bowls and make them your own by experimenting with different vegetables, grains, and garnishes, creating endless possibilities for every palate.
