Delightful Mini Summer Fruit Tarts: A Refreshing Treat for Warm Days
Introduction
As the temperatures rise and the sun graces us with longer days, our culinary cravings often shift towards light, refreshing desserts that capture the essence of summer. The vibrant colors and flavors of seasonal fruits not only tantalize our taste buds but also evoke the joy and warmth of sunny afternoons. One dessert that perfectly embodies this seasonal delight is the delightful mini summer fruit tarts. These charming treats serve as an ideal way to enjoy the bounty of summer, combining a crisp, flaky crust with a luscious filling and a colorful array of fresh fruits. Easy to prepare and visually stunning, they are the quintessential dessert for summer gatherings, picnics, and cozy evenings at home.
The Allure of Mini Tarts
Mini tarts hold a special place in the culinary world, celebrated for their bite-sized nature and elegant presentation. Unlike their larger counterparts, mini tarts offer a perfect portion for individual enjoyment, making them an excellent choice for entertaining. Whether served at a garden party or a family barbecue, their petite size allows guests to indulge without the guilt of a hefty slice. Moreover, the versatility of mini tarts means they can be filled with a wide variety of flavors, from rich chocolate ganache to tangy lemon curd, catering to diverse palates and preferences.
The visual appeal of mini tarts is undeniable; their colorful toppings of fresh fruit create a stunning display that can brighten any table. Each tart can be a canvas for creativity, allowing you to mix and match fruits based on availability and personal taste. This adaptability not only makes them a favorite among home bakers but also ensures they remain a timeless dessert option.
Ingredients Overview
To create delightful mini summer fruit tarts, you will need a handful of key ingredients that come together to deliver a harmonious blend of flavors and textures.
– Tart Crust Ingredients: The foundation of these tarts lies in the crust, which provides a flaky, buttery base. The primary ingredients include all-purpose flour, powdered sugar, and unsalted butter. The flour contributes structure, while the powdered sugar adds a touch of sweetness and helps achieve that delicate crumb. The butter, when combined correctly, is essential for creating a rich, flaky texture that crumbles delightfully in each bite.
– Filling Components: A smooth and creamy filling is what makes these tarts irresistible. For the filling, you will need cream cheese, granulated sugar, and vanilla extract, blended together to create a rich base. The cream cheese imparts a tangy richness, while sugar balances the flavors with sweetness. Adding whipped cream lightens the mixture, making it airy and indulgent without being overwhelming.
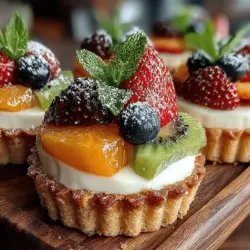
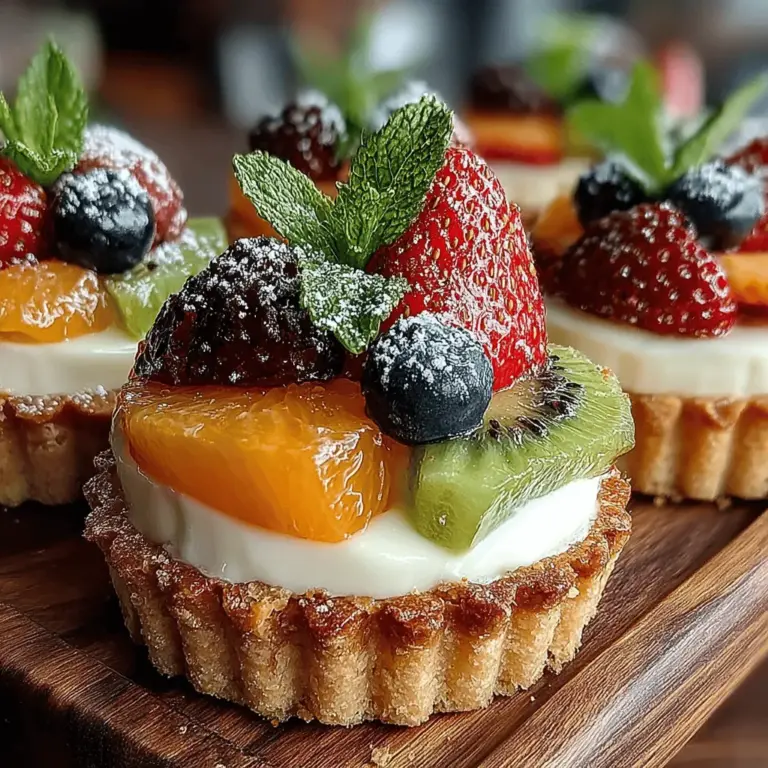
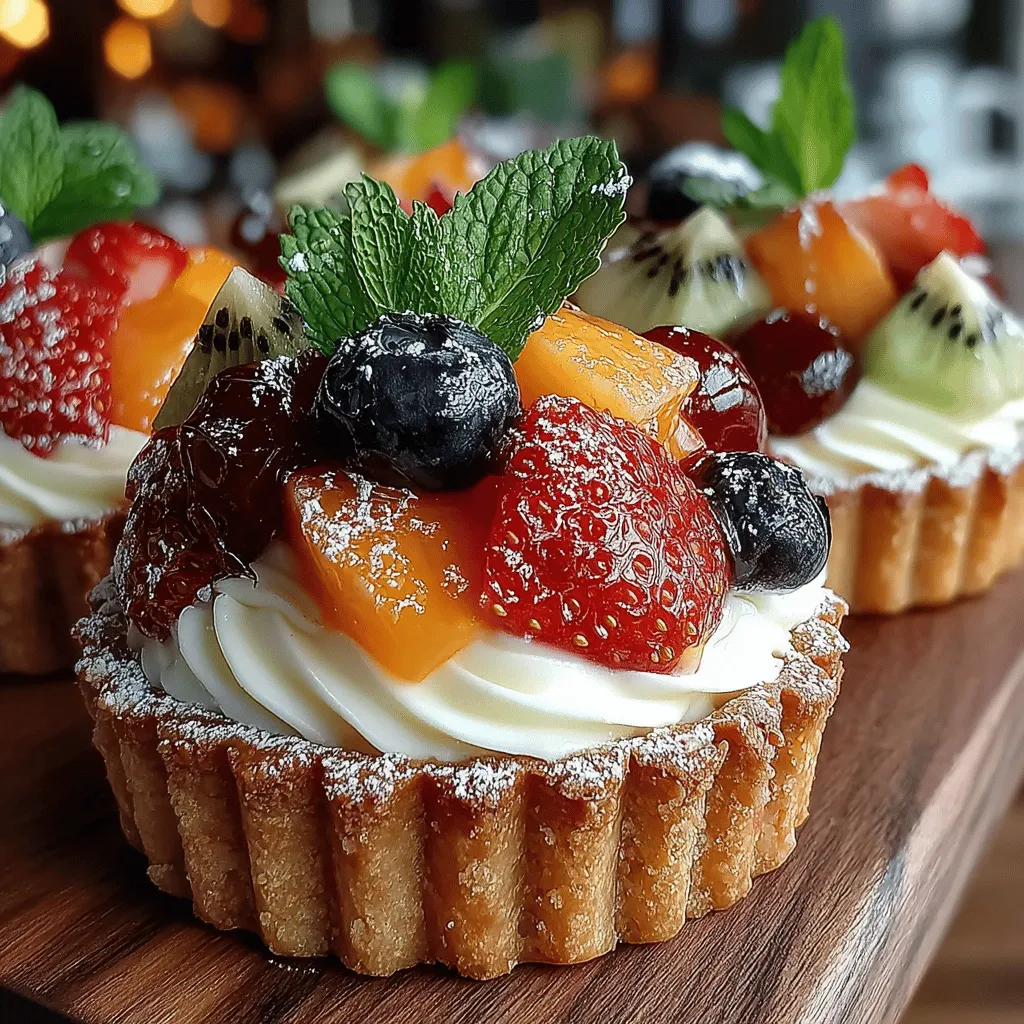
– Fresh Summer Fruits: The star of these tarts is undoubtedly the fresh summer fruits. Seasonal favorites include strawberries, blueberries, peaches, and raspberries, which not only provide vibrant colors but also a medley of flavors ranging from sweet to tart. Using fresh, ripe fruits is crucial, as their natural sweetness and juiciness enhance the overall experience. Additionally, feel free to customize your selection based on personal preferences or what you have on hand, ensuring your mini tarts are unique to your taste.
– Optional Garnish: To elevate both the presentation and flavor of your mini tarts, consider adding fresh mint leaves as a garnish. The bright, herbal notes of mint complement the sweetness of the fruits, adding an extra layer of freshness that enhances the dessert’s appeal.
Step-by-Step Instructions for a Perfect Tart Crust
Creating a perfect tart crust is a fundamental step in ensuring your mini summer fruit tarts are a success. Follow these detailed instructions to achieve a flaky and delicious crust that serves as the perfect base for your filling and toppings.
– Mixing the Ingredients: Begin by combining the dry ingredients—specifically, the all-purpose flour and powdered sugar—in a mixing bowl. Use a whisk to blend them evenly. Next, cut the cold, unsalted butter into small cubes and add it to the flour mixture. Using a pastry cutter or your fingers, work the butter into the flour until the mixture resembles coarse crumbs. This process is essential for achieving that desired flaky texture, as it creates little pockets of butter that will steam during baking.
– Incorporating Egg Yolk and Water: Once the butter is adequately mixed in, it’s time to bind the crust together. Add an egg yolk to the mixture, which will enrich the dough and provide a beautiful color. Gradually add ice-cold water, one tablespoon at a time, mixing until the dough starts to come together. Be cautious not to overwork the dough; it should be moist but not sticky.
– Chilling the Dough: After forming the dough, shape it into a disc and wrap it in plastic wrap. Refrigerate it for at least 30 minutes. Chilling the dough is a crucial step, as it solidifies the butter and relaxes the gluten in the flour, leading to a tender, flaky crust after baking.
– Blind Baking Process: Once chilled, roll out the dough on a lightly floured surface to a thickness of about 1/8 inch. Cut out circles that fit your mini tart pans and gently press the dough into the molds. To prevent the crust from puffing up during baking, use the blind baking method: line the crusts with parchment paper and fill them with pie weights or dried beans. Bake in a preheated oven until the edges are lightly golden. This step is vital to avoid a soggy bottom, ensuring a crisp crust that perfectly complements the creamy filling and fresh fruits.
Crafting the Cream Cheese Filling
With the tart crust successfully baked and cooled, it’s time to prepare the delicious cream cheese filling that will bring your mini summer fruit tarts to life.
– Beating the Cream Cheese: Start by ensuring your cream cheese is softened to room temperature; this is crucial for achieving a smooth and creamy consistency. Place the softened cream cheese in a mixing bowl and use an electric mixer to beat it until it is light and fluffy. This process incorporates air into the cream cheese, making it easier to blend with the other ingredients.
As you prepare to combine the remaining filling components, remember that the balance of flavors is key. The following steps will guide you in creating a filling that is not only delicious but also perfectly complements the fresh fruit topping.
Stay tuned for the next part of this article, where we will continue with the preparation of the filling and the assembly of your delightful mini summer fruit tarts!
Whipping the Cream
To create a light and airy filling for our delightful mini summer fruit tarts, whipping the cream is a crucial step. Start by ensuring your heavy cream is chilled; this will help it whip up faster. Use a mixing bowl that is also cold, as this aids in achieving better volume. Using a hand mixer or stand mixer, begin whipping the cream on medium speed until it starts to thicken. Once it reaches a soft peak stage, when you lift the beaters, the cream should form peaks that gently flop over.
Continue whipping until you reach stiff peaks, where the cream stands tall and firm when the beaters are lifted. Be cautious not to over-whip, as this can lead to a grainy texture or even butter formation. Achieving stiff peaks is essential for our filling, as it provides a stable structure that supports the weight of the fresh fruit without collapsing, ensuring that each tart retains its beautiful shape and texture.
Folding Technique
Once your cream is whipped to perfection, it’s time to incorporate it with any additional flavorings or ingredients—such as powdered sugar or vanilla extract—needed for your tart filling. This is where the folding technique comes into play. Gently add the whipped cream to your flavored base (such as cream cheese or yogurt) in a large mixing bowl. Using a spatula, scoop from the bottom and fold over the top, turning the bowl as you go. This method preserves the airiness of the whipped cream, which is vital for a light and fluffy filling.
Fold just until the mixture is combined. You want to see swirls of the base and the whipped cream rather than a completely uniform mixture. This gentle incorporation ensures your filling remains airy and delicious, contributing to the overall lightness of the mini tarts.
Assembling the Mini Tarts
Filling the Tart Shells
Now that your filling is prepared, it’s time to assemble the mini tarts. There are several methods to fill the tart shells, each offering a different aesthetic appeal. One popular method is using a piping bag fitted with a star tip. This technique allows you to create beautiful swirls or rosettes of filling that not only look professional but also provide the perfect amount of cream in each bite.
If you don’t have a piping bag, you can simply use a spoon to fill each tart shell. Start by placing a generous dollop of the filling into each shell, then smooth it out with the back of the spoon or an offset spatula. Regardless of the method you choose, aim for a slightly heaping filling that doesn’t overflow but still looks inviting.
Arranging the Fruit
The arrangement of fresh fruit is what truly makes these mini tarts visually stunning. Start by selecting a variety of colorful fruits such as strawberries, blueberries, and peaches. For a harmonious look, aim for a balance of colors and textures. For instance, the vibrant red of strawberries can be paired with the deep blue of blueberries and the soft orange of peaches.
When placing the fruit, consider layering them for a more dynamic presentation. You can slice strawberries into fan shapes or use whole blueberries for a pop of color. Place the fruit strategically, allowing some of the filling to peek through for an inviting look. This presentation not only entices the eye but also adds to the flavor experience, as each bite delivers a delightful mix of textures and tastes.
Serving Suggestions
Chilling Before Serving
Once your mini tarts are assembled, it’s best to chill them in the refrigerator for at least 30 minutes before serving. Chilling enhances the flavors of the filling and allows it to set slightly, making each tart easier to handle. Plus, the cool temperature is incredibly refreshing on a warm summer day, providing a delightful contrast to the sweetness of the fruit.
Presentation Ideas
For a stunning presentation, consider serving your mini fruit tarts on a large platter, garnished with fresh mint leaves or edible flowers for an extra touch of elegance. Alternatively, you can place each tart in individual dessert cups or small glass jars for a more personalized serving style. This option is perfect for parties or gatherings, as guests can easily pick up their own treat.
Health Benefits of Fresh Fruits
Using fresh summer fruits in your mini tarts not only enhances their flavor but also packs in numerous health benefits. Fruits like strawberries, blueberries, and peaches are rich in vitamins, antioxidants, and dietary fiber, making them a nutritious addition to your dessert.
Nutritional Value
Strawberries are an excellent source of vitamin C, which supports immune health and skin vitality. Blueberries are known for their high antioxidant content, helping to combat oxidative stress in the body. Peaches provide a good amount of vitamins A and C, along with potassium, which aids in heart health. By filling your tarts with these nutrient-dense fruits, you’re not just indulging in a delicious treat; you’re also nourishing your body.
Seasonal Eating
Encouraging readers to opt for seasonal produce is vital for both flavor and sustainability. Summer fruits are at their peak ripeness during the warmer months, meaning they’re sweeter, juicier, and more flavorful than their out-of-season counterparts. Choosing seasonal fruits also supports local farmers and reduces the environmental impact associated with long-distance transportation.
Storing Your Mini Tarts
To maintain the quality of your mini tarts, proper storage is essential.
Refrigeration Tips
If you have leftover tarts, store them in the refrigerator in an airtight container. This will keep the crust from becoming soggy while preserving the freshness of the filling and fruit. If you’re planning to make the tarts ahead of time, consider assembling the tart shells and filling them, then add the fruit just before serving. This way, the fruit retains its texture and vibrant color.
Serving Freshness
Mini fruit tarts are best enjoyed fresh, ideally within 1-2 days of assembly. However, they can be stored for up to three days if kept properly refrigerated. Just be mindful that the longer they sit, the more the crust may absorb moisture, affecting its crispness. For the best experience, aim to serve the tarts at their peak freshness, allowing everyone to enjoy the delightful combination of buttery crust, creamy filling, and juicy fruit.
Conclusion
Making and sharing mini summer fruit tarts is a joyful way to celebrate the vibrant flavors of the season. These delightful treats not only look stunning but also provide a delicious way to enjoy fresh fruits’ health benefits. Encourage creativity in the kitchen by experimenting with different fruits and flavors, allowing each baker to make the recipe their own. Whether for a summer gathering, a family dinner, or simply to enjoy on a sunny afternoon, these mini tarts are sure to impress and satisfy. Embrace the bounty of summer and indulge in these delightful mini fruit tarts, crafting memories that will last long after the final bite.